Neo Email SPF, DKIM, DMARC Record Configuration - Authentication Email Domain
Check your domain for DMARC, DKIM, SPF and MX records. Get a free report.
How to Setup SPF, DKIM, DMARC Record for Neo Email?
This article will guide you how to setup Neo Email SPF, DKIM, and DMARC records to authenticate your custom email domain.
SPF, DKIM, and DMARC are the necessary email authentication protocols that protect your domain against scams. Moreover, the inbox providers like Google, Yahoo, and Outlook require proof of identity for successful email delivery.
If the incoming emails lack these protocols, the inbox providers mark your emails as spam. Therefore, it is important to verify your emails by setting up the Neo DNS records in your DNS provider.
Configure Neo DNS Records:
Sign up for the Neo Mail account with the domain you want to authenticate.
After you sign up, the system will take you directly to the domain authentication process.
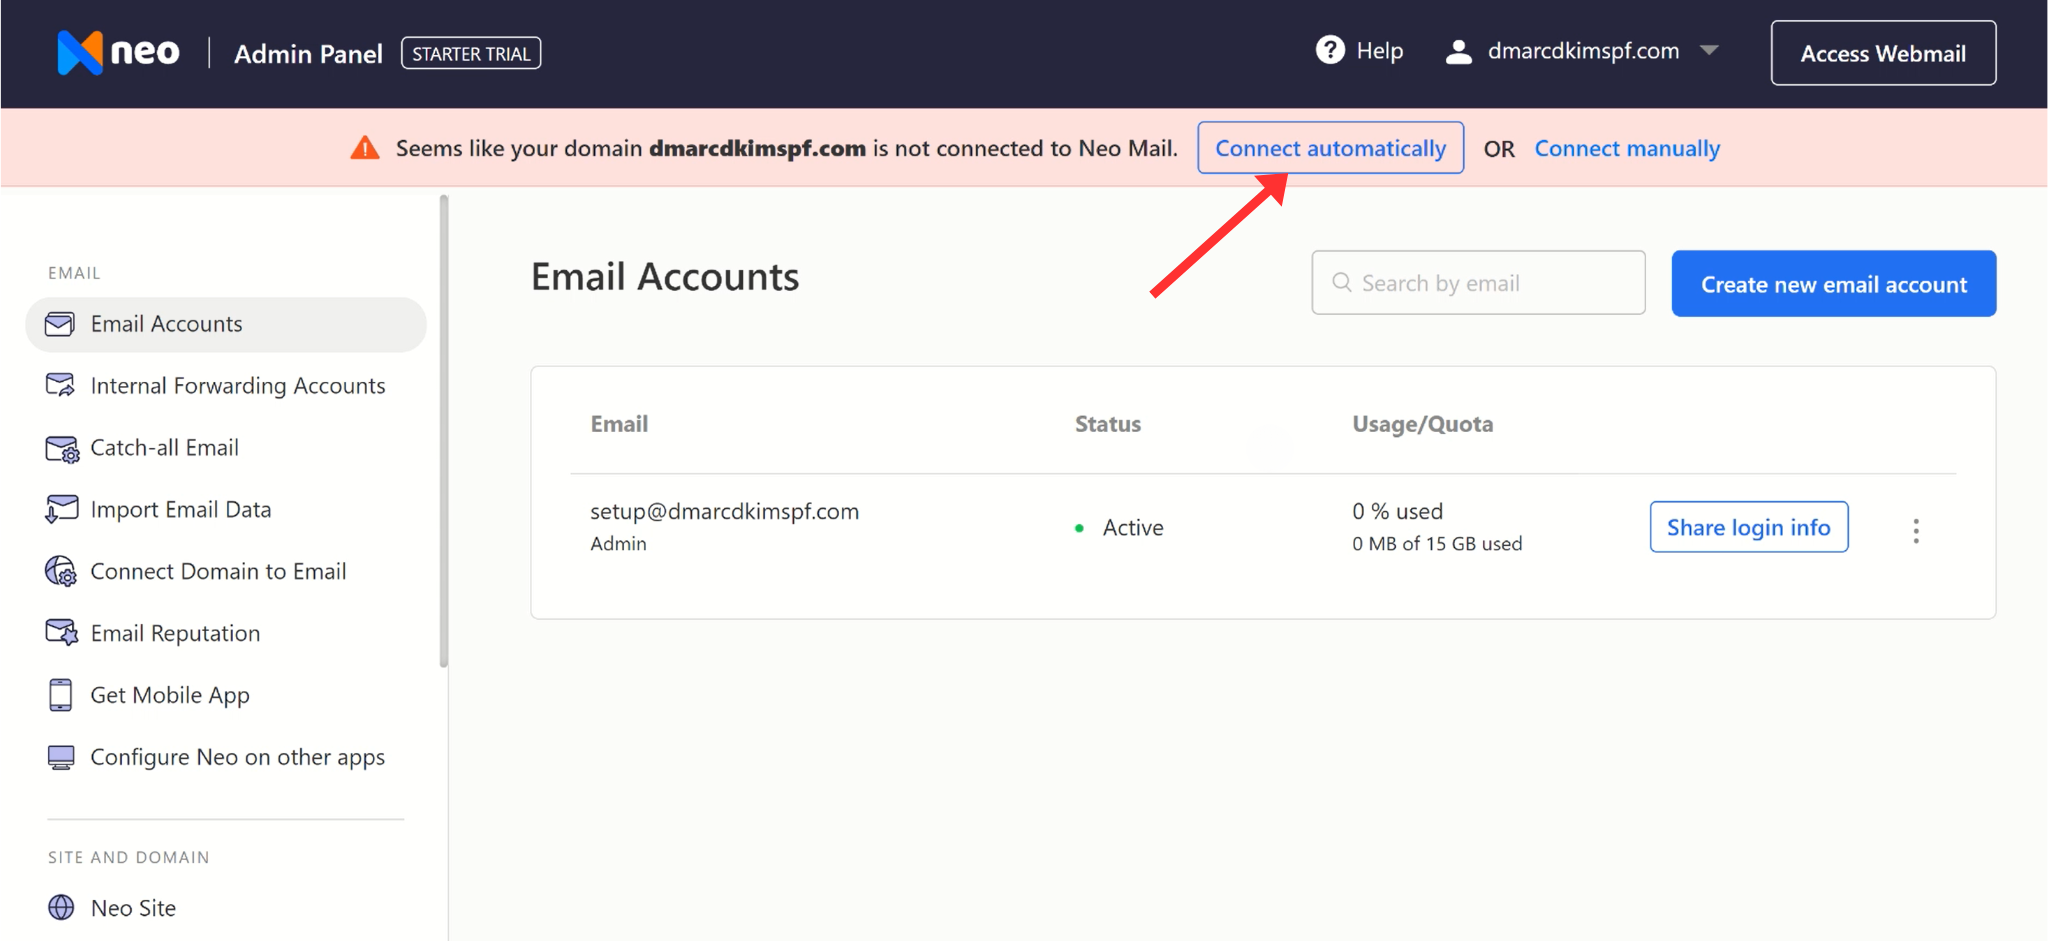
You will also see the option to connect your domain to Neo Mail at the top of the dashboard. Here you'll see two options: "Connect Automatically" or "Connect Manually."
Connect Domain Automatically:
-
Click "Connect Automatically" at the top of your screen.
-
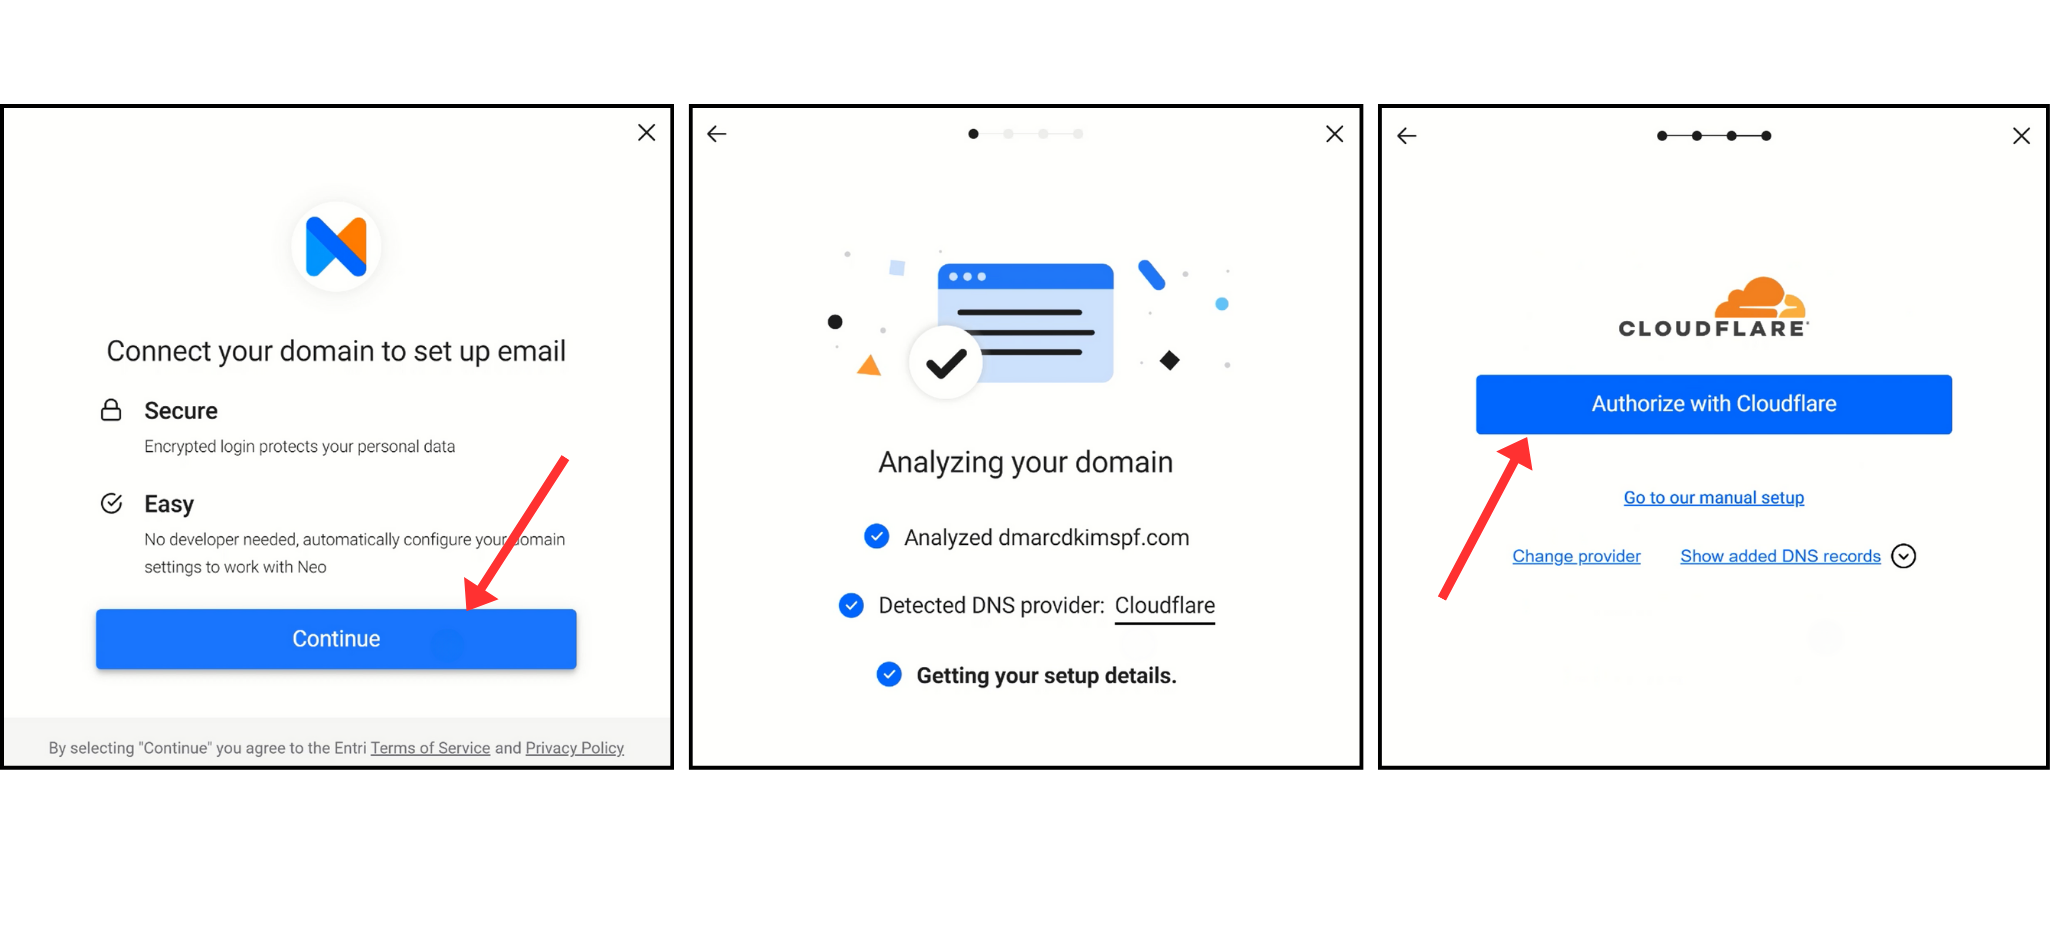
Click Continue, wait for the system to analyze your domain, and click Authorize.
-
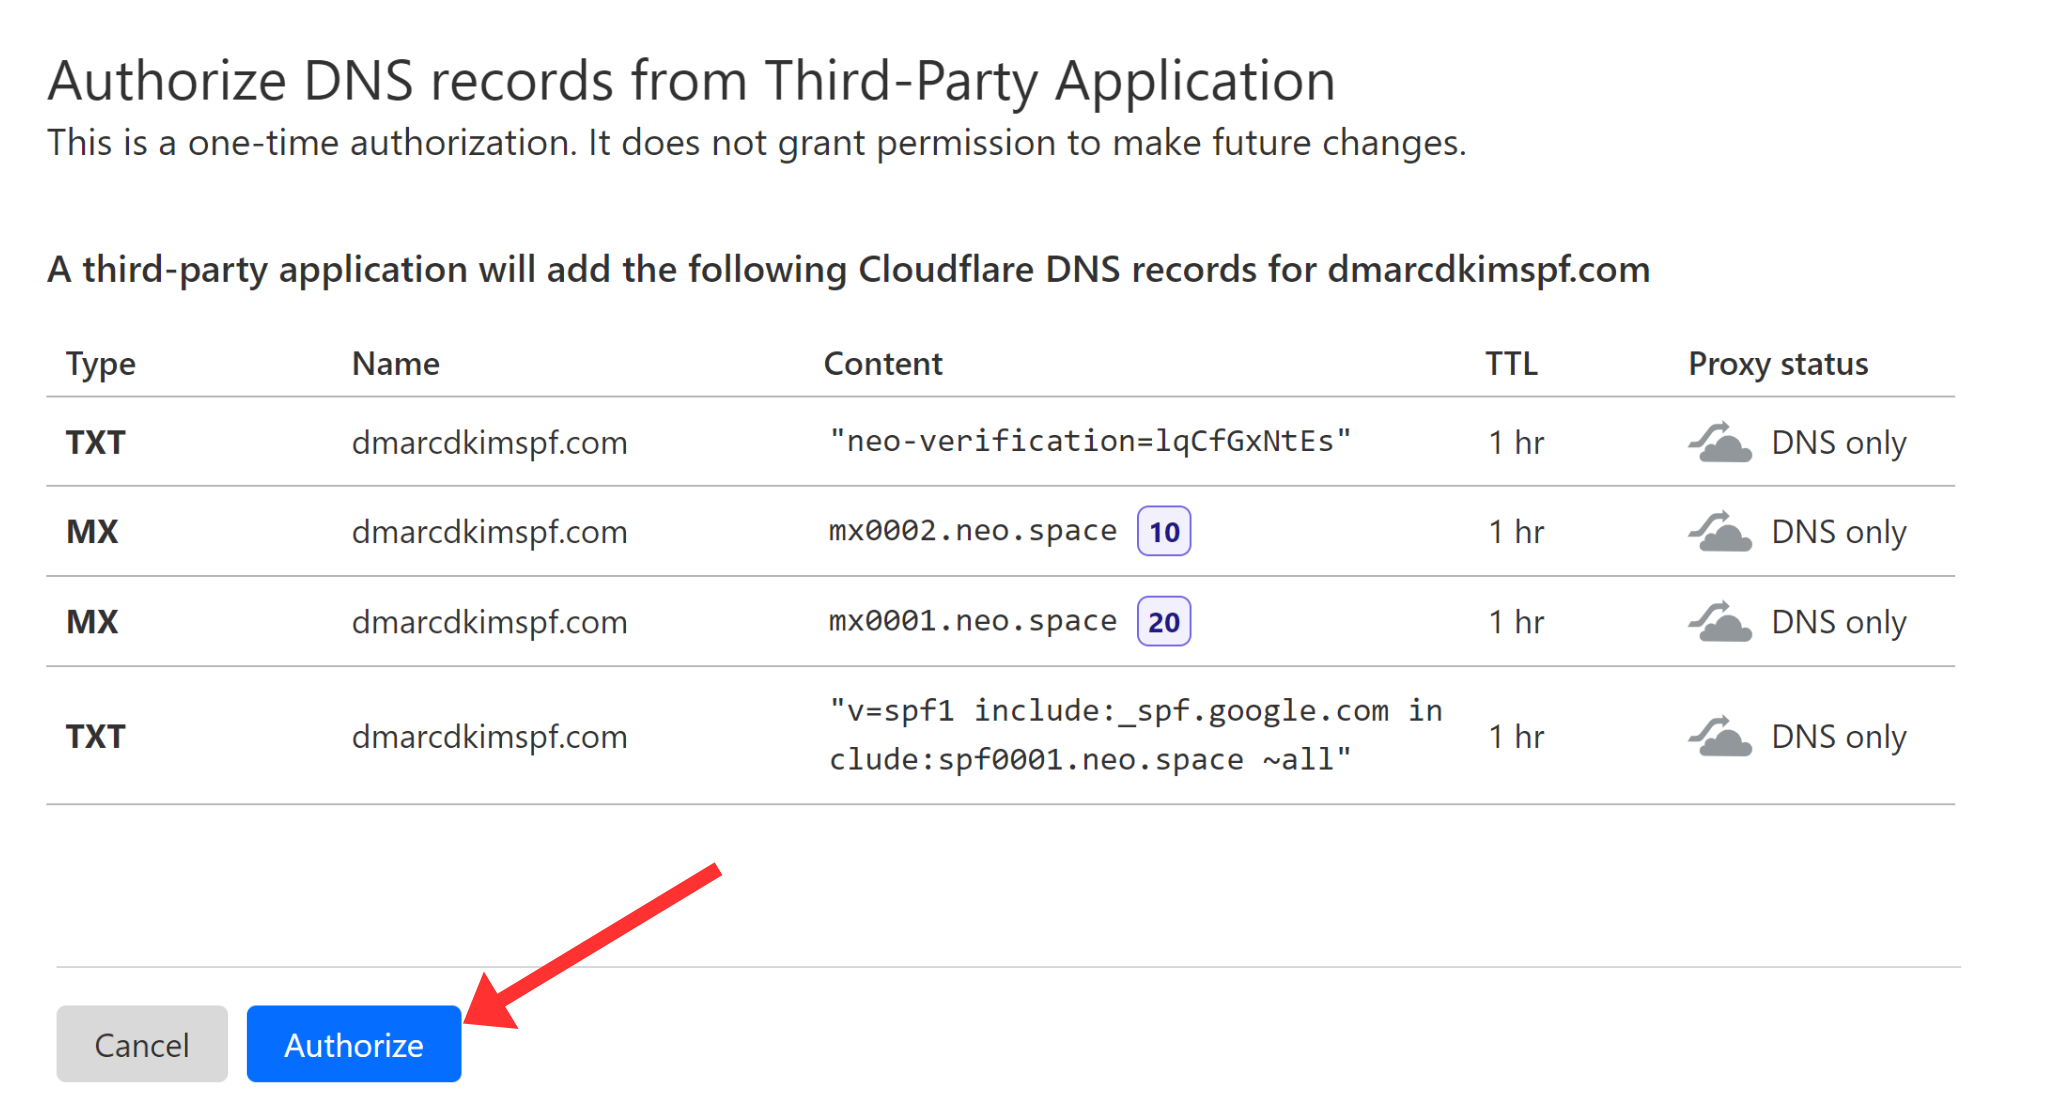
It directs you to the DNS provider, login, and there you will see the list of all DNS records already added. Click Authorize to confirm your action.
Connect Domain Manually:
-
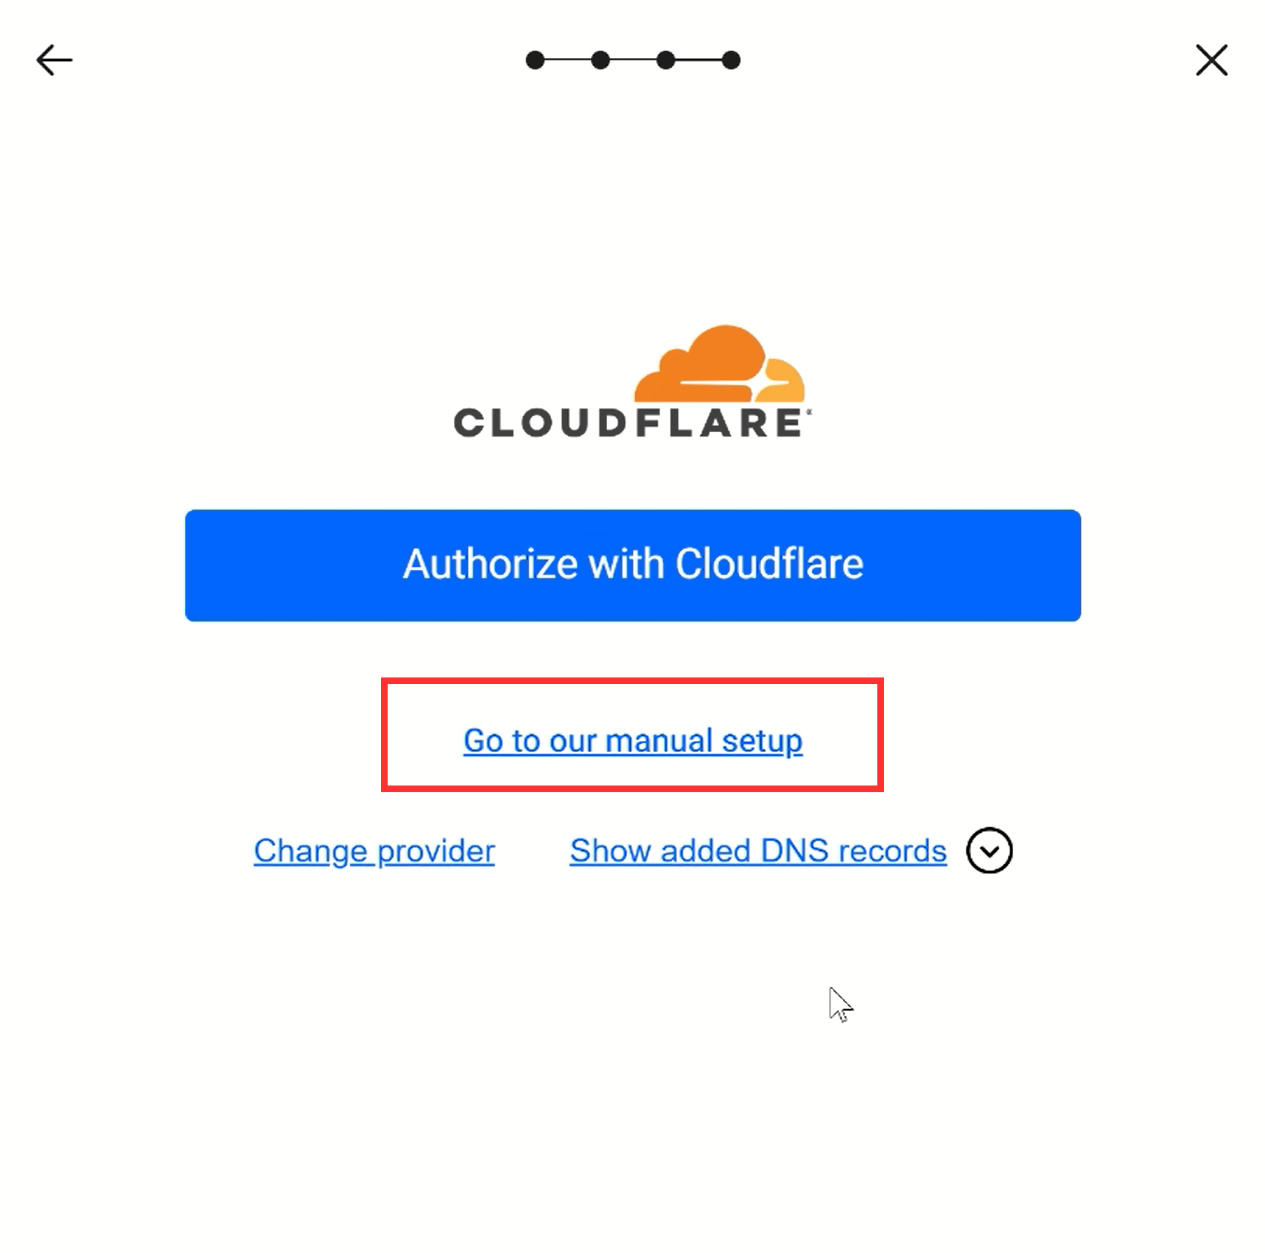
If you want to setup records manually, click "Go to our manual setup."
-
The pop-up window will display Neo SPF, DKIM, MX, and verification records.
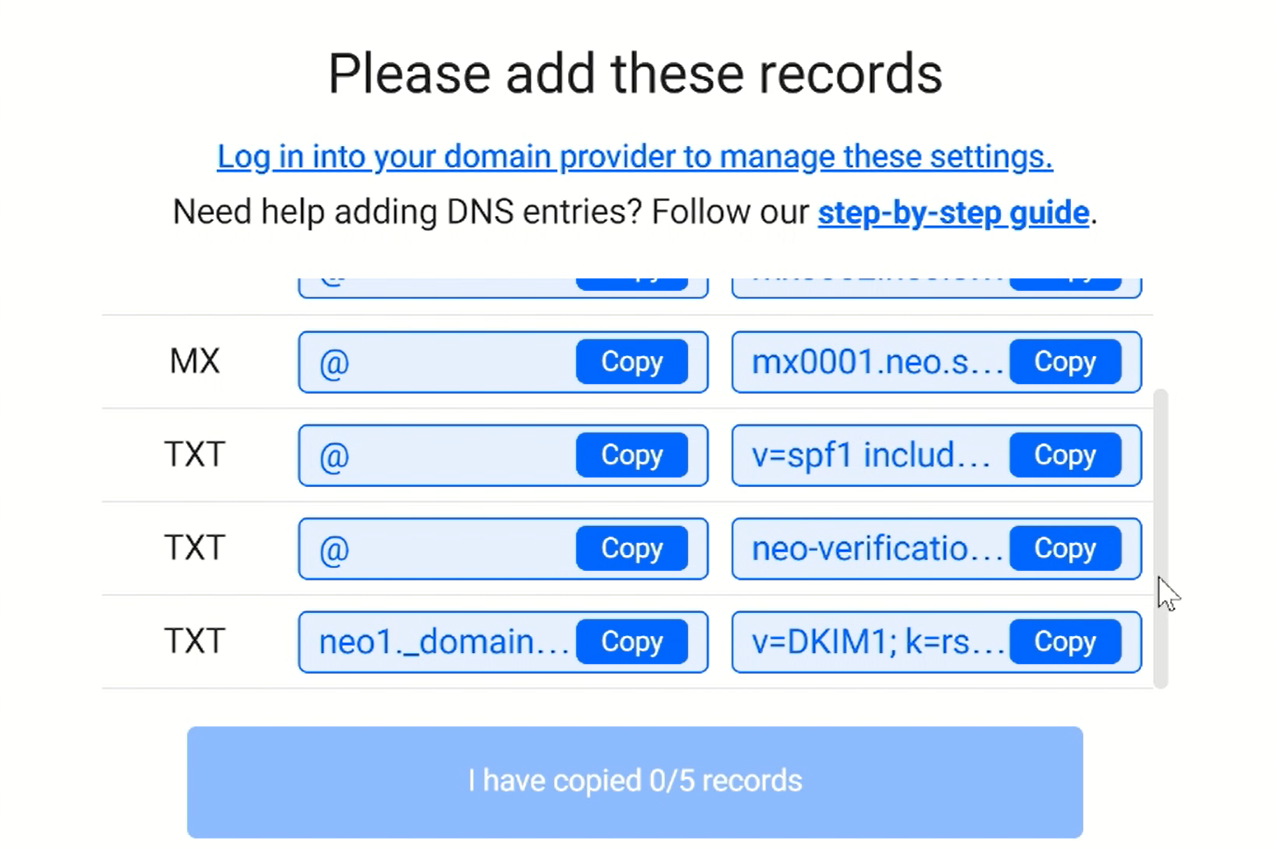
Add all these records to your DNS provider. Make sure you have the logins for your domain provider.
Setup Neo Mail Verification Record:
Login to your DNS provider. We are using Cloudflare for this tutorial.
Select your domain and go to the DNS tab.
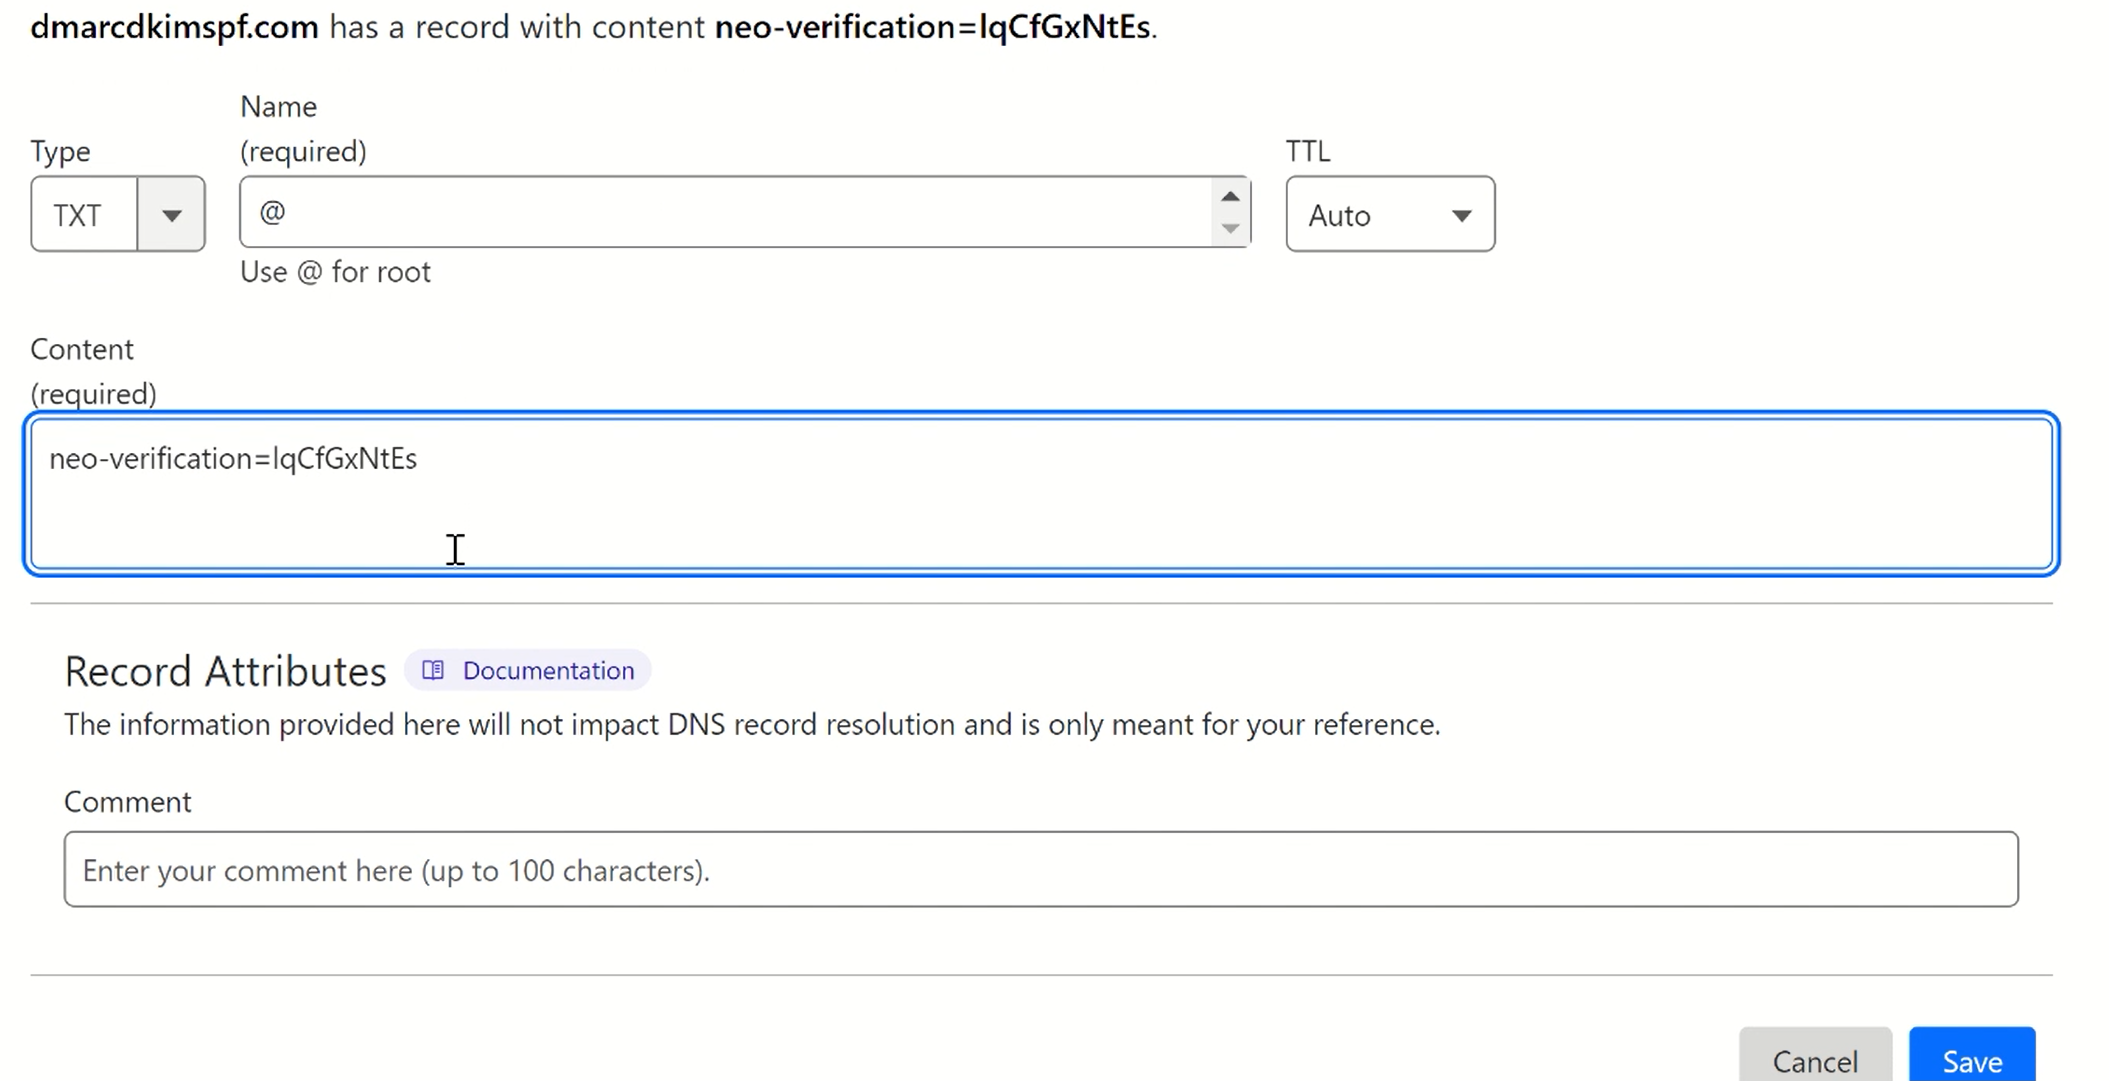
Click Add Record and select record type TXT.
Write "@" in the Name field.
Copy the Neo verification record and add it to the Content field.
-
Click Save.
Setup Neo Mail MX Records:
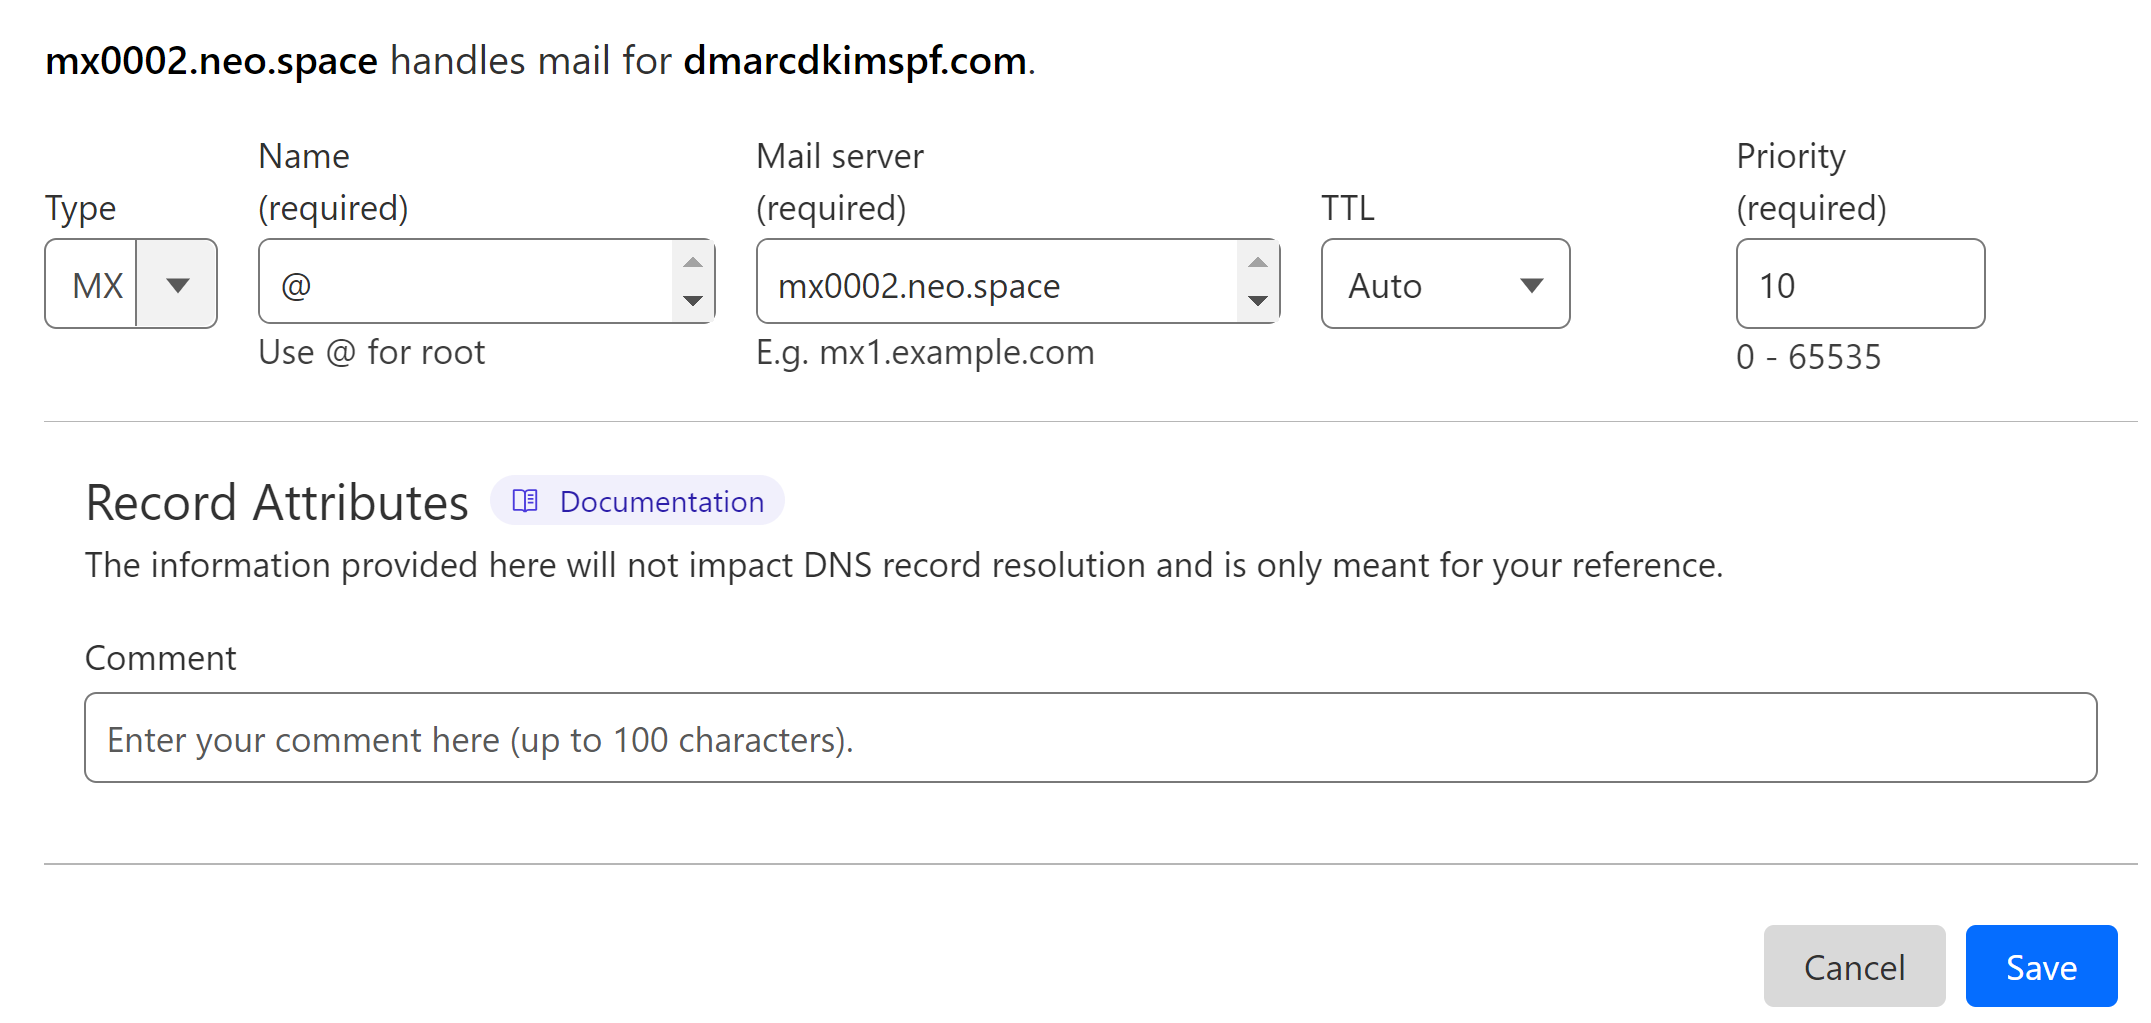
Select record type MX.
In the Name field, write "@."
In the Mail Server field, write the MX value.
Select priority 10 and click Save.
-
Add the second MX record with priority "20."
Setup Neo Mail SPF Record:
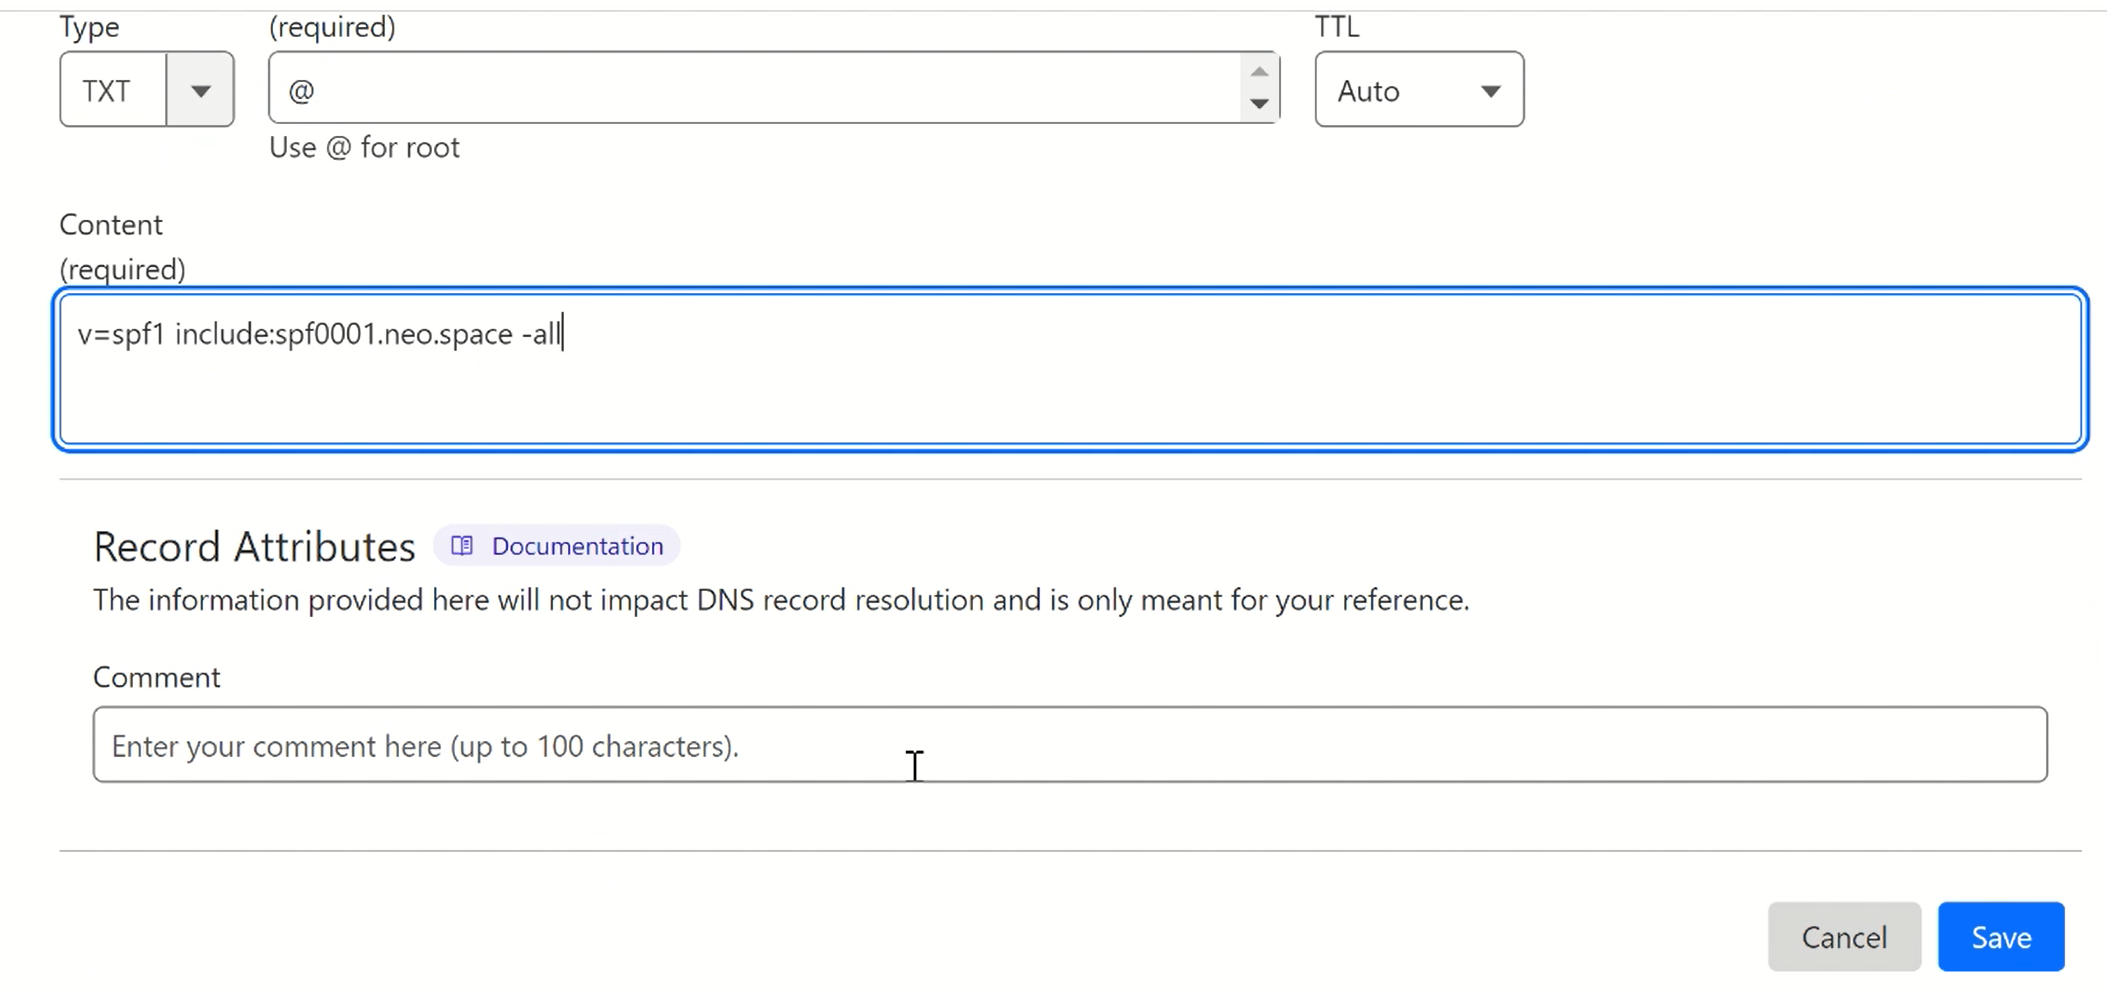
Select type TXT and write "@" in the record name field.
In the Content field, write SPF value: v=spf1 include:spf0001.neo.space -all.
-
Click Save.
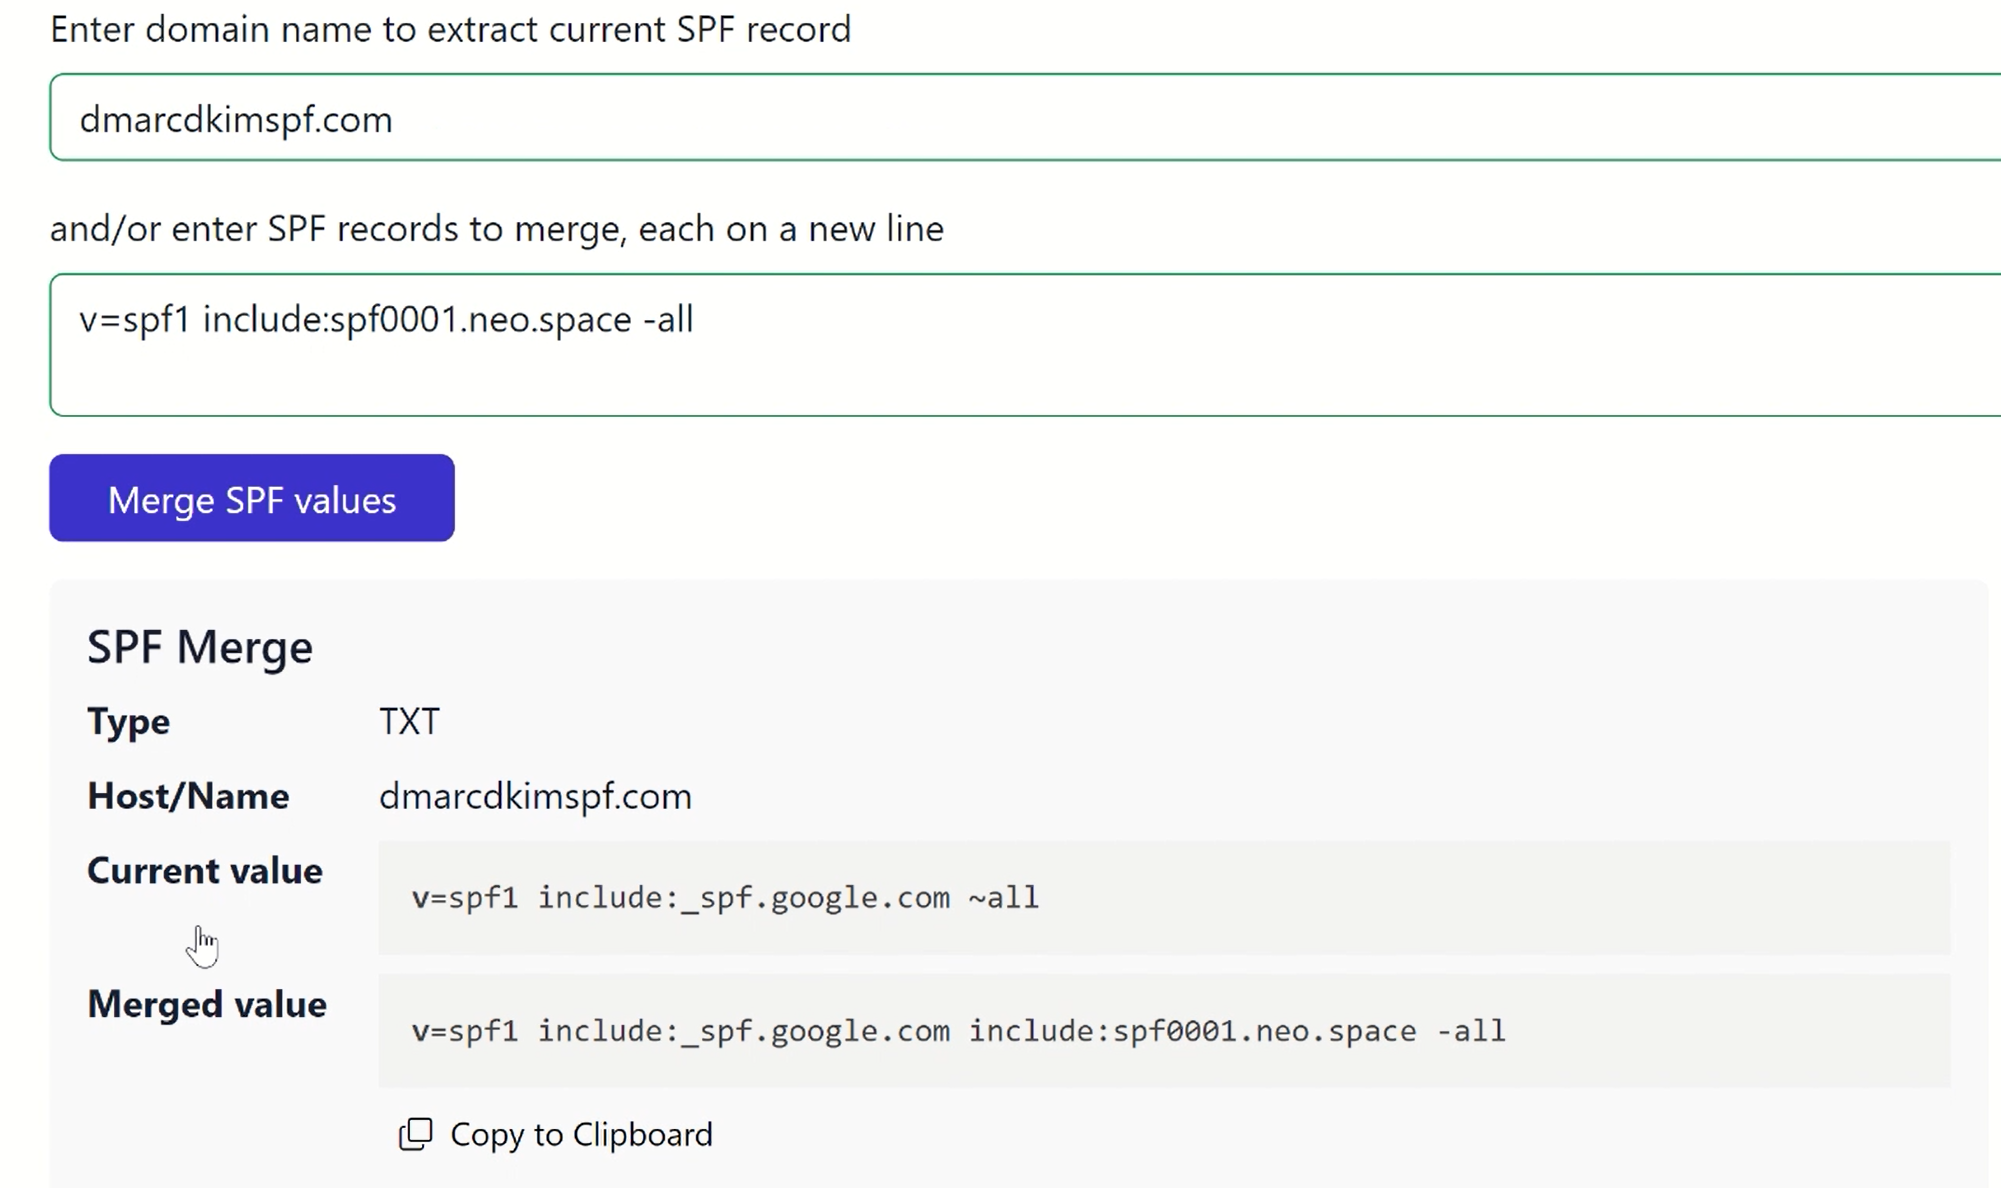
How Merge Multiple SPF Records? If your domain has an existing SPF value, you can not add the Neo SPF value. Adding more than one SPF record causes one of them to stop working.
To merge SPF values from different sources, you can use the DmarcDkim.com SPF Merge Tool.
Open the SPF merge tool.
Add your domain name and Neo Mail SPF value.
Click Merge SPF Values.
The tool detects your existing SPF record and merges it with Neo SPF.
-
Copy the merged value and replace the existing value with it.
Setup Neo Mail DKIM Record:
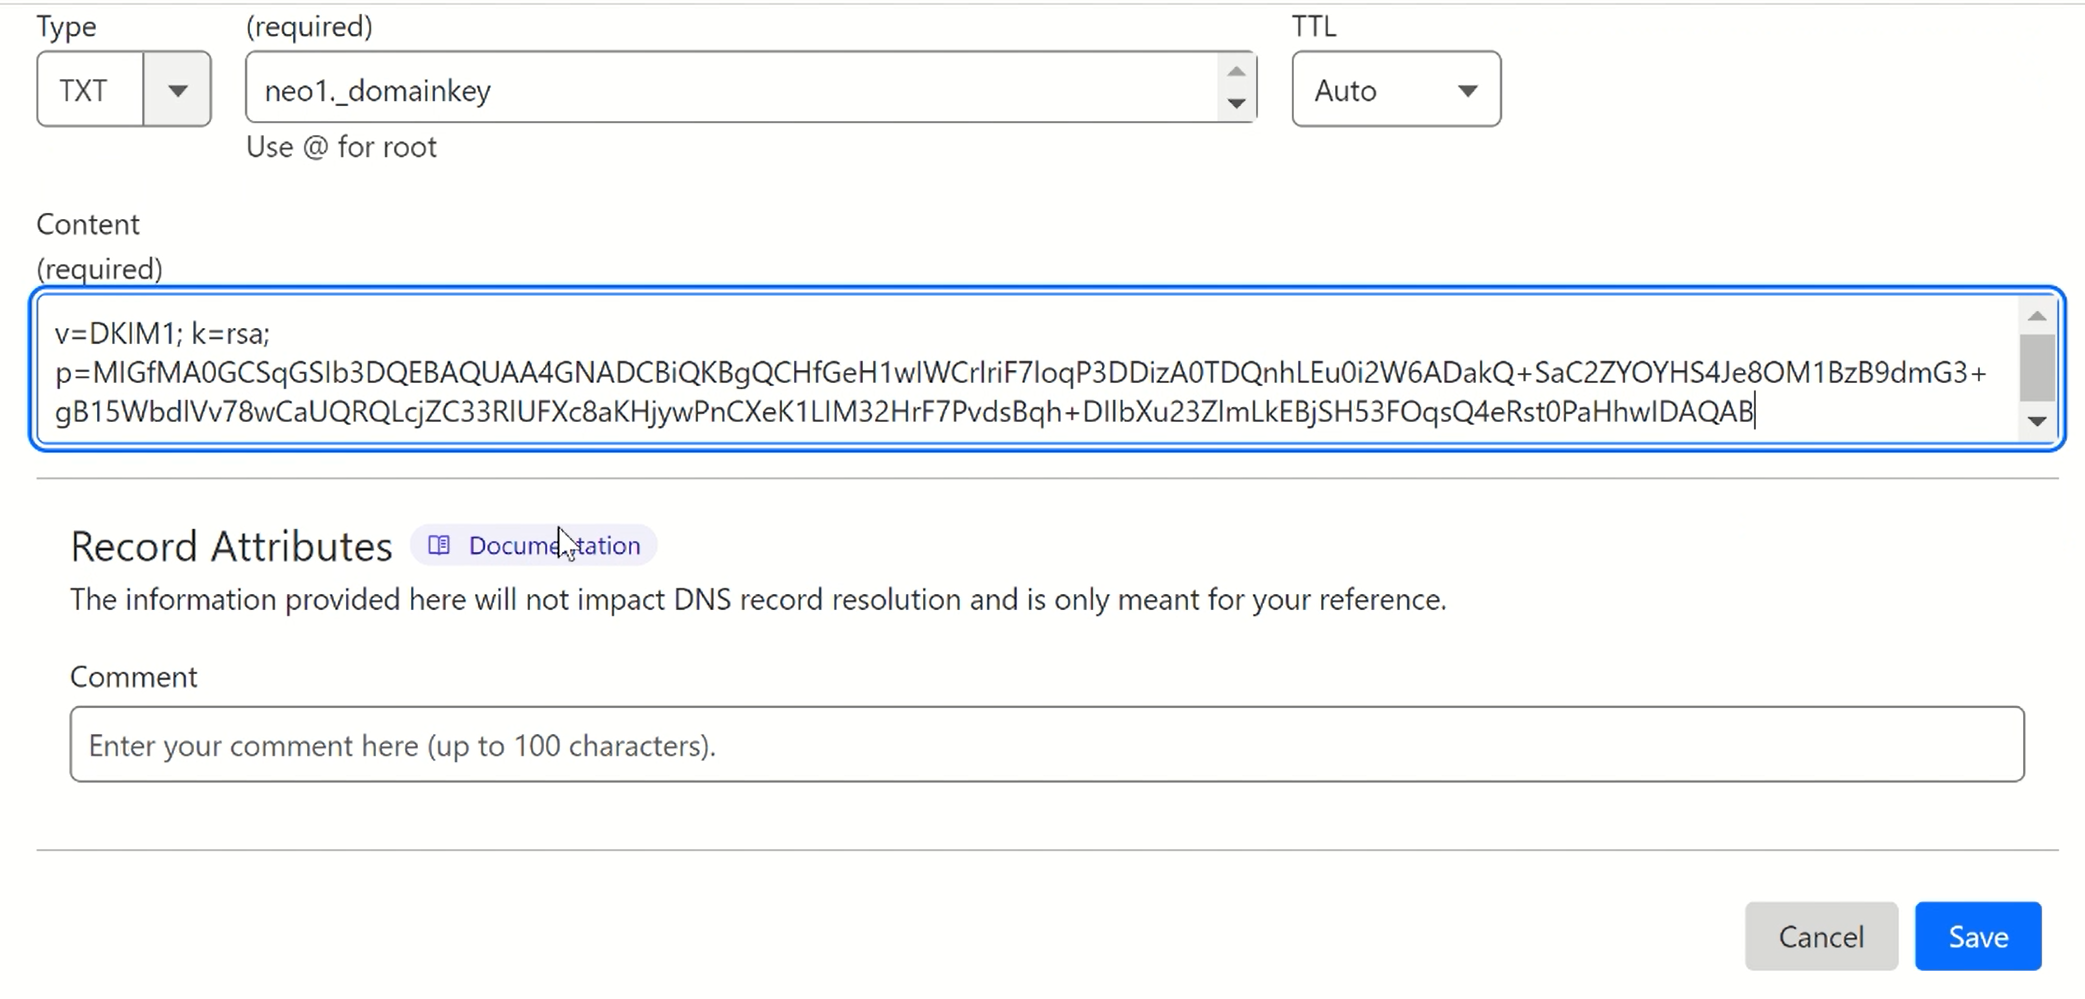
Select type TXT.
Copy the record name and value from Neo Mail.
Paste both into the dedicated fields of your DNS provider.
-
Save the record.
Setup Neo Mail DMARC:
To generate an effective DMARC policy, you can use the DmarcDkim.com tool. It guides you through every step of setting up a strict policy and gives you actionable insights into DMARC reports.
Open the DMARC check tool.
-
Add your domain name and click Check.

-
The tool gives you a suggested value. Add it to your DNS provider.

-
Click Sign up now to get access to the DMARC reports dashboard.

Verify Neo Mail DNS Records:
Go to the Connect Domain to Email tab in the left navigation menu.
-
Here the badges for the DNS records will be displayed in green, indicating that the records are verified.
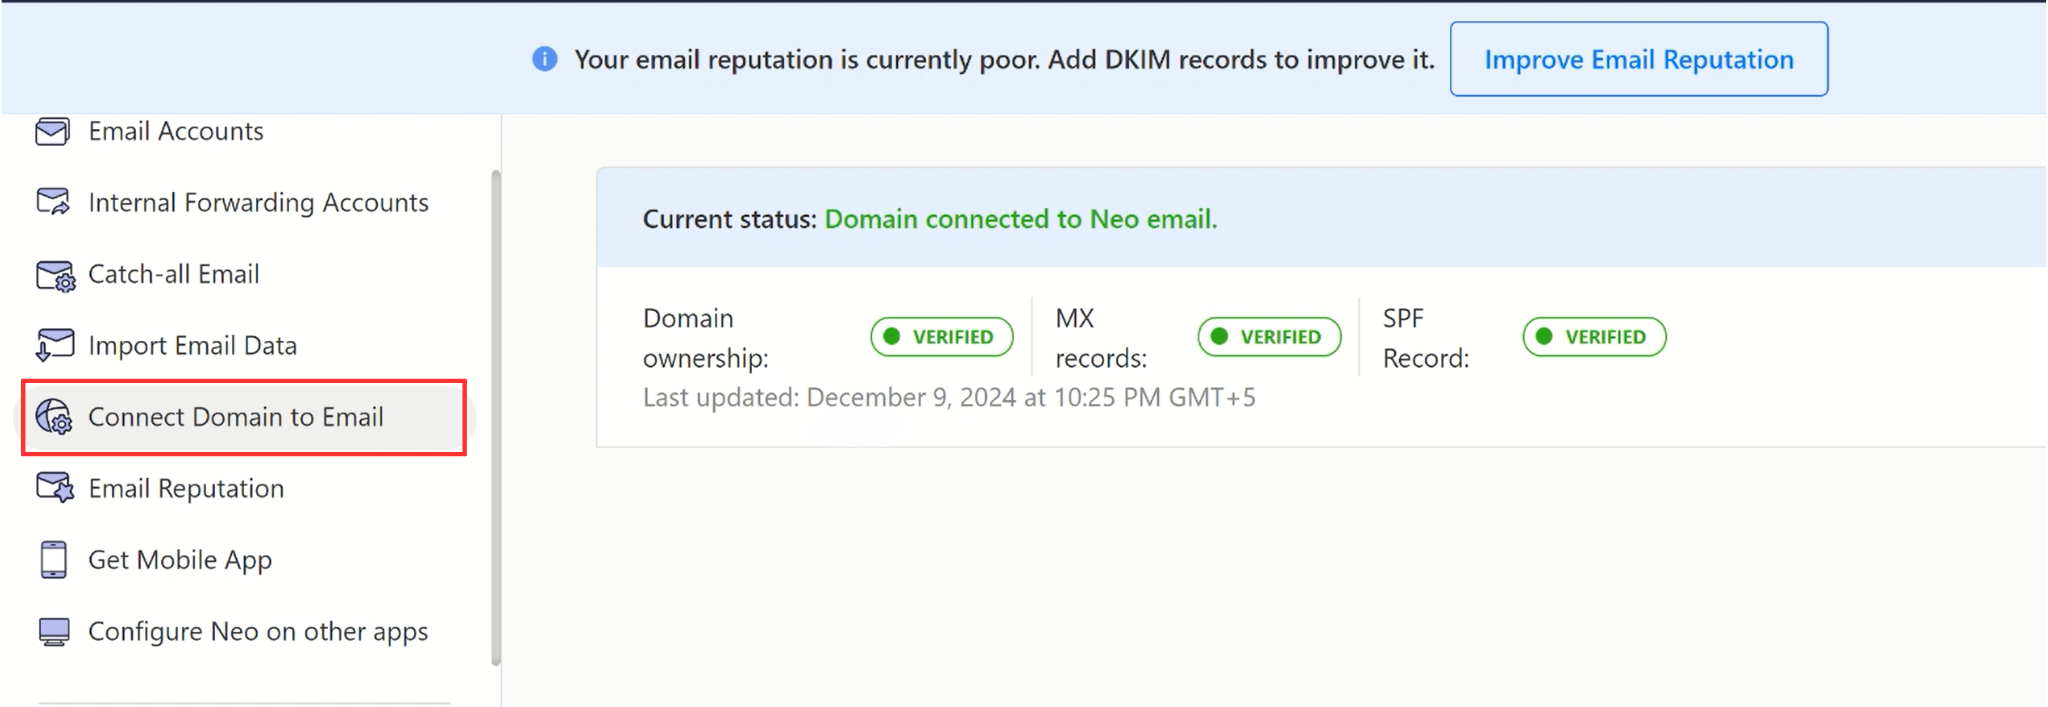
If the records are not verified, click Check Again.
-
Now go to the Email Reputation tab and click Check Again to verify Neo DKIM value.
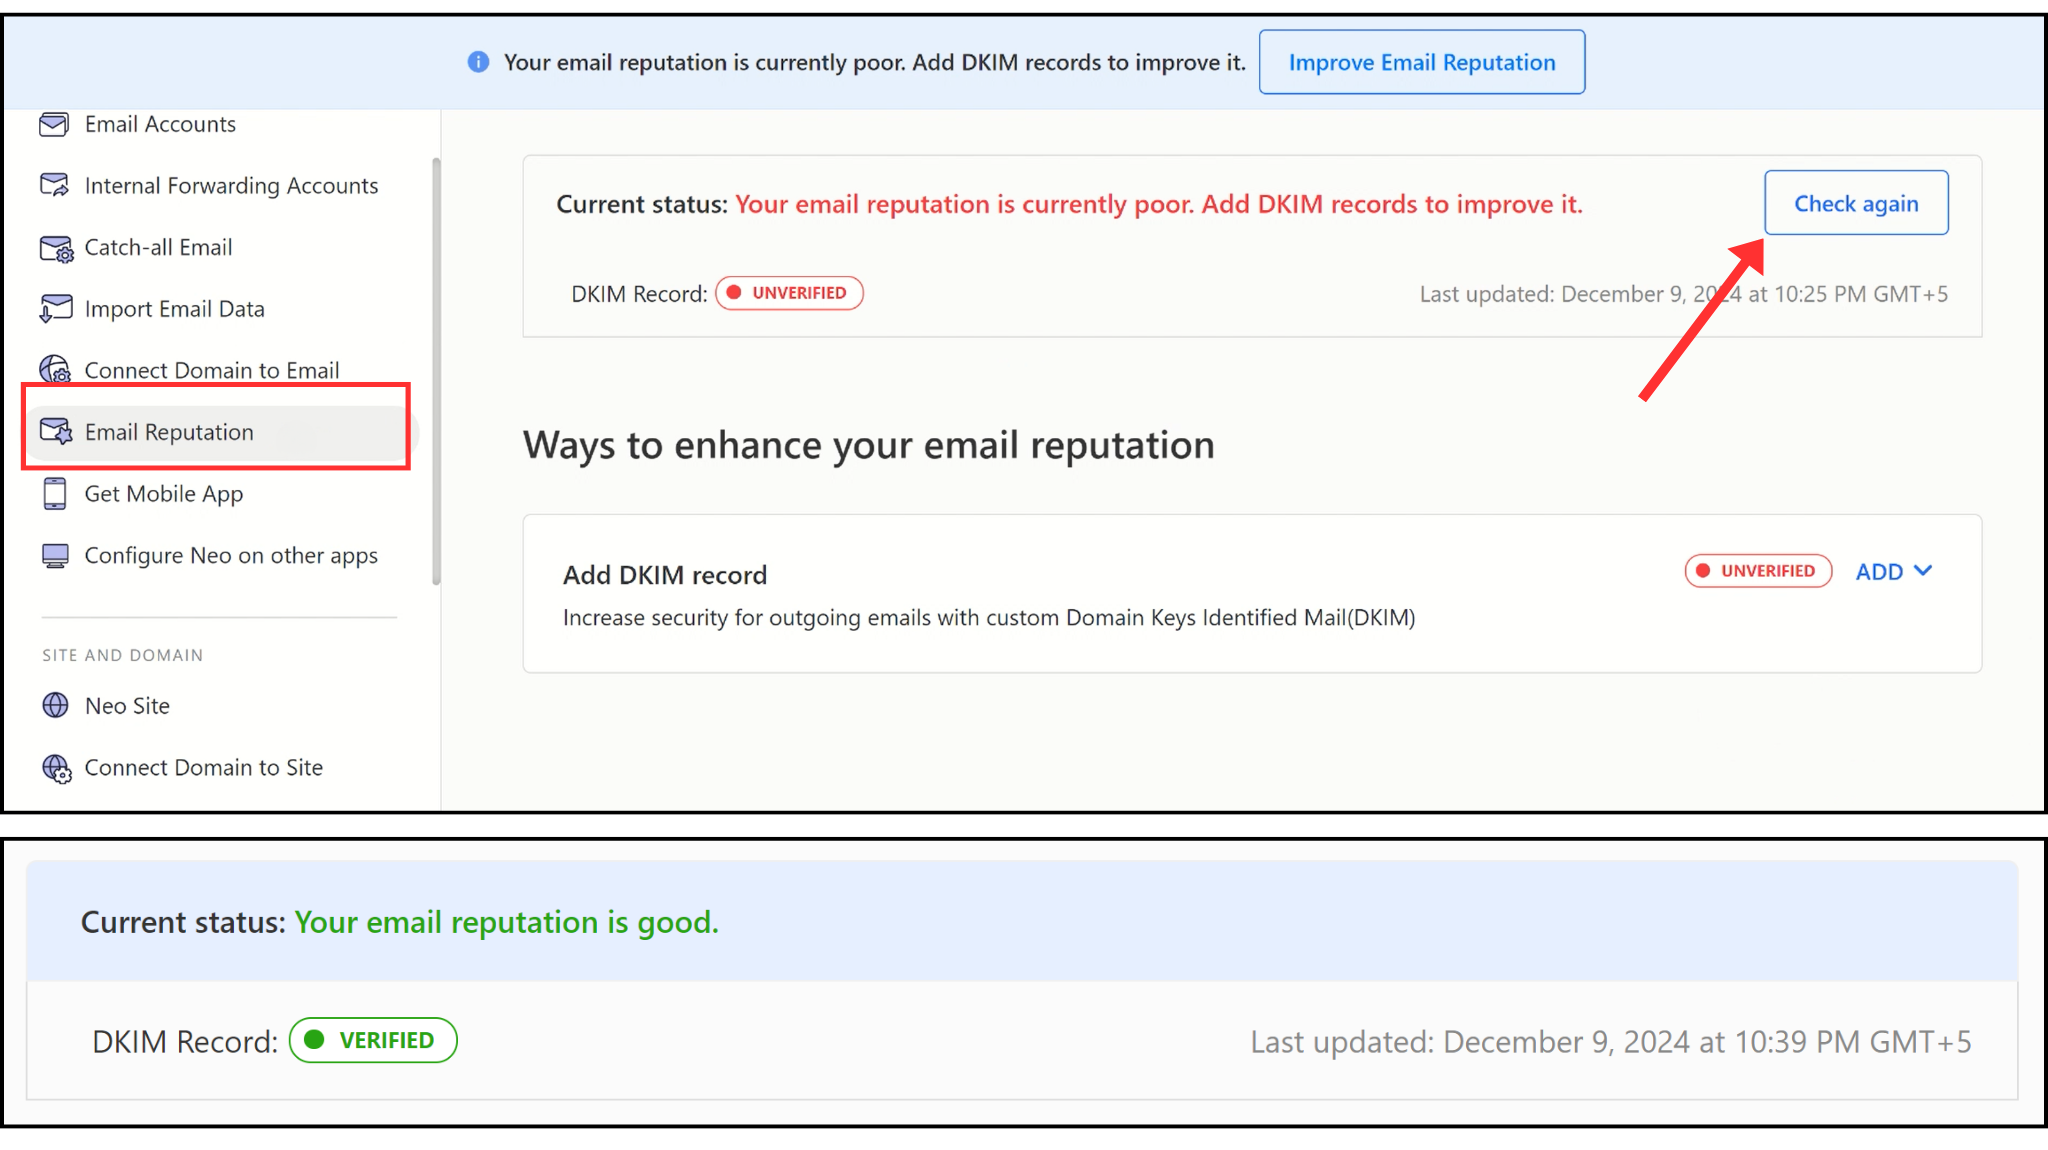
If the verification is still pending, wait 48 hours for the servers to update the DNS status.
Check again after 48 hours and if verification fails, contact a DmarDkim.com expert to help you out.
Connect your Domain to Neo Site:
Head to the Connect Domain to Site option in the left navigation menu.
-
Click the Connect Site button.
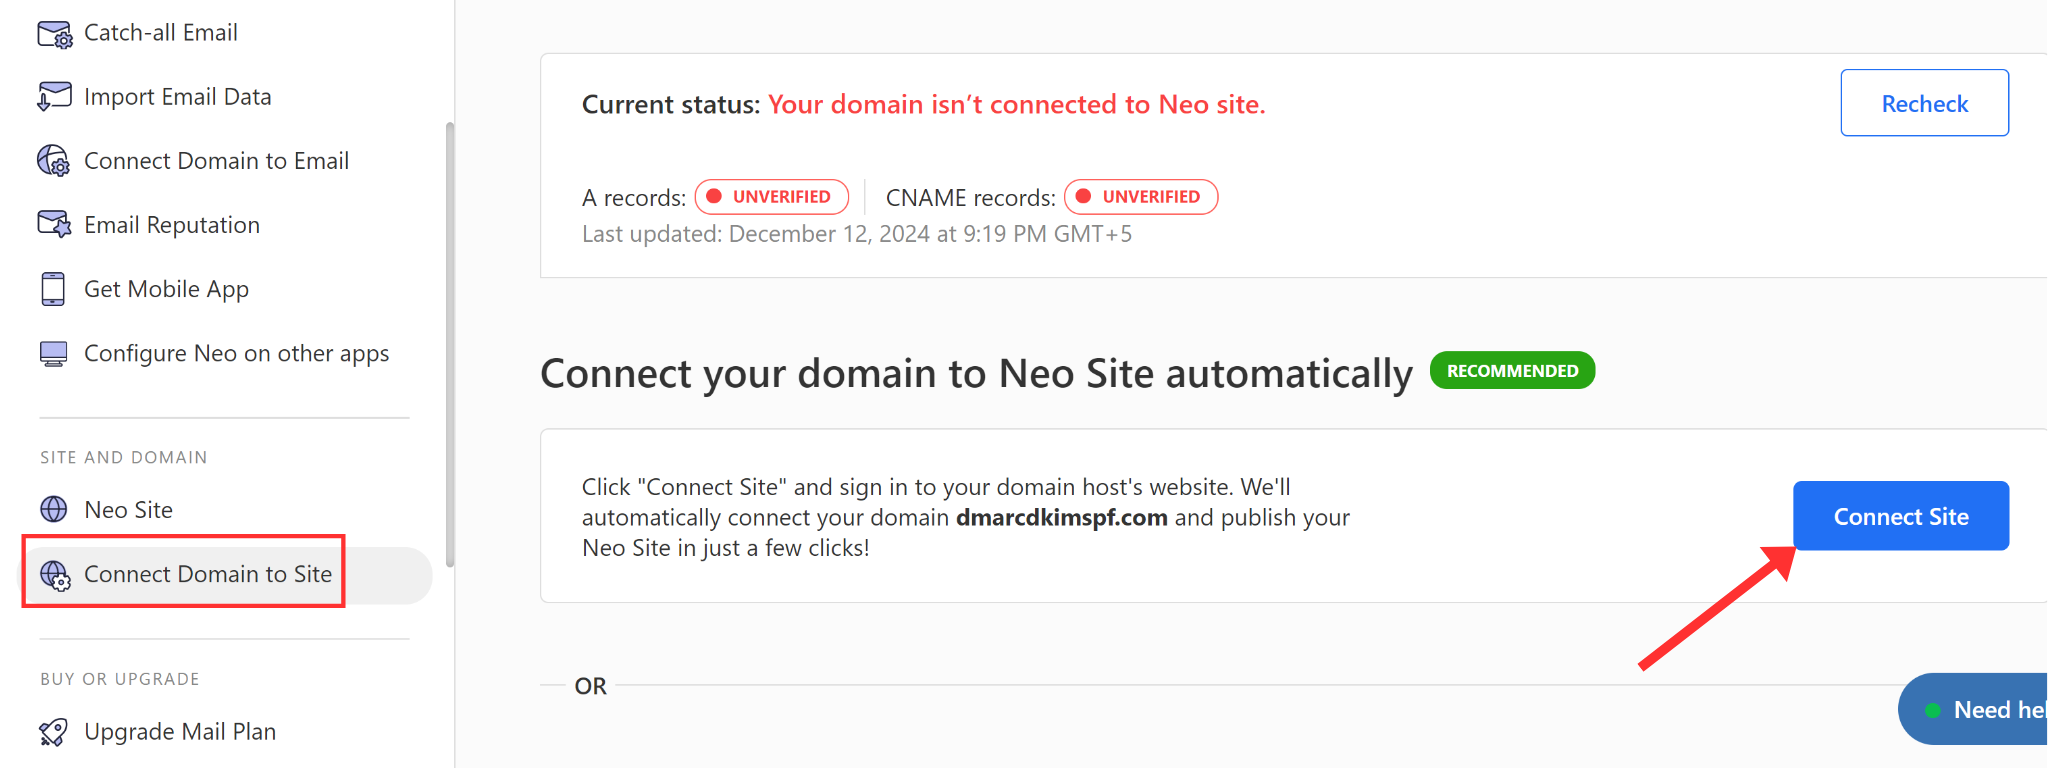
It will analyze your domain and open your DNS provider.
All the domain connection records will be added to your DNS dashboard automatically.
Click Authorize to confirm your action.
-
You can also add the records manually.
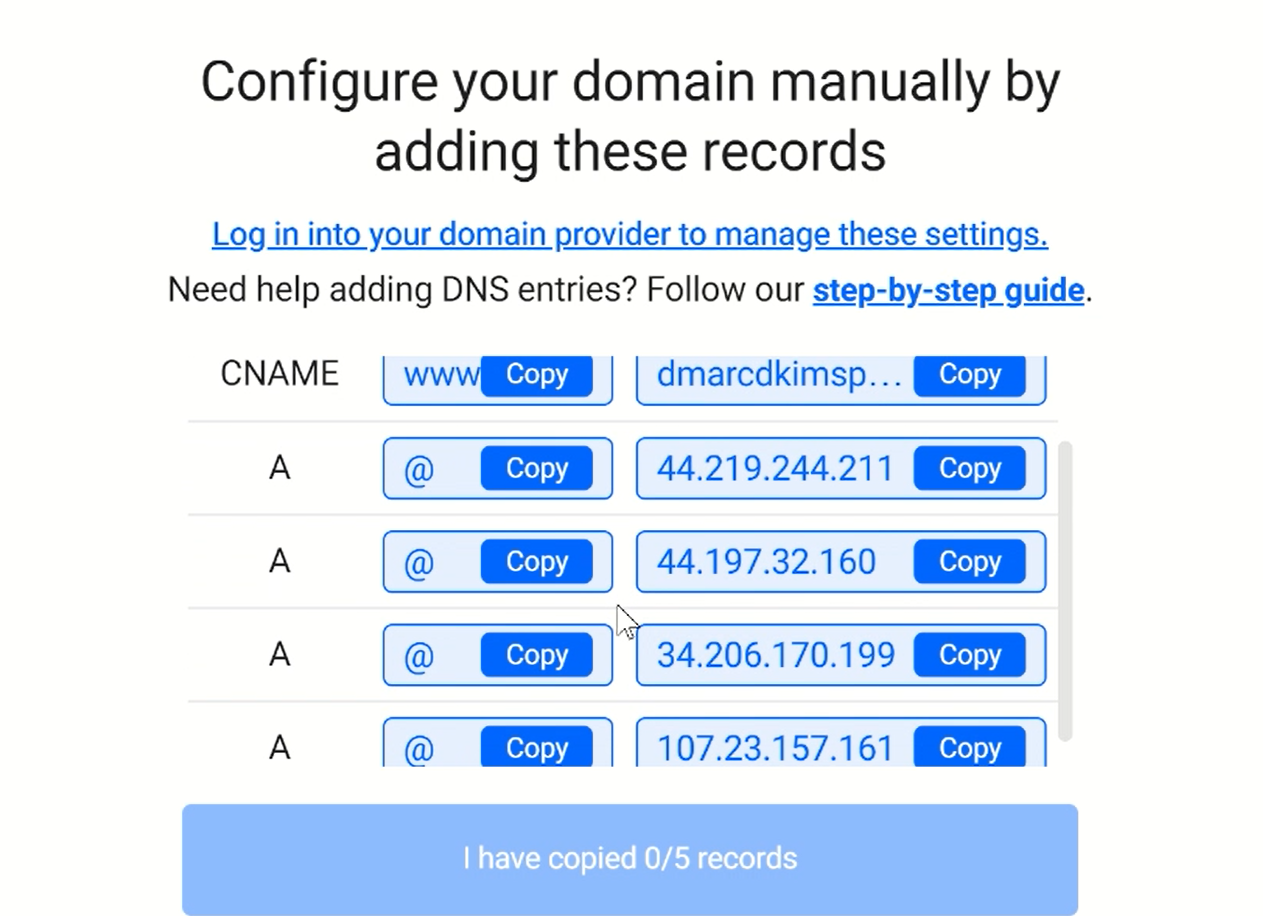
Setup all the above-mentioned records into your DNS dashboard.
Once added, click the Refresh button.
-
If records are verified, the badge next to A and CNAME record turns green.

If verification fails, wait for 48 hours and check again.
For support and assistance, hire a DmarDkim.com expert.
Check domain and follow the instructions to nail down your DMARC configuration.
No expert knowledge needed!


